
Of all the skills student pilots must develop, ground reference maneuvers (including rectangular course, turns around a point, and s-turns),are among the least understood. This article explains why these maneuvers are important and how to execute and conquer them.
Why are ground reference maneuvers important?
Ground reference maneuvers help students understand the relationship between flight control pressure inputs and the resulting attitudes of the airplane. Simply put, they help pilots get a better feel for their aircraft. Additionally, they allow pilots to develop a sense of aircraft awareness based on external visual references, which allows them to predict and account for the effects of wind drift. These skills form the basis for traffic patterns, survey, photographic, sightseeing, crop dusting, and various other flight profiles that require a specific flightpath referenced to points on the surface.
Before we jump into the maneuvers, Paul Duty, Gleim Aviation chief instructor shares this key tip: “with ground reference maneuvers, there is a direct correlation between groundspeed and bank angle. Faster groundspeeds equal steeper bank angles. Remember this, and it’s hard to go wrong.”
Rectangular Course
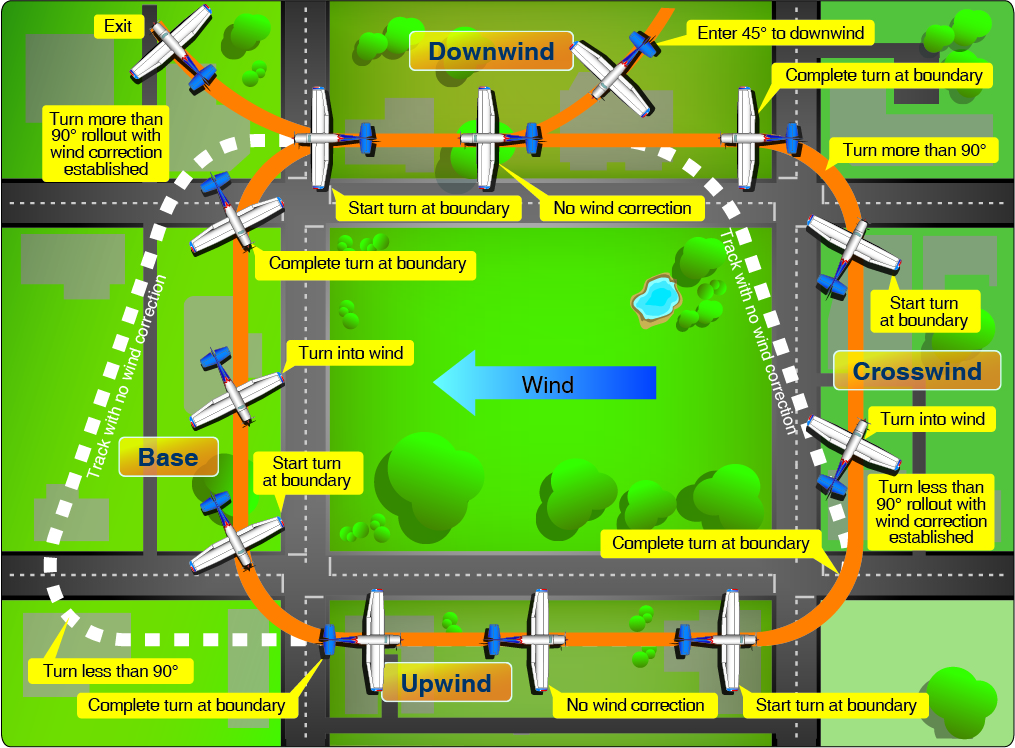 The purpose of the rectangular course maneuver is to educate students about the different legs in a traffic pattern and the considerations required when entering each of those legs. While performing a rectangular course maneuver, pilots should maintain a constant altitude, airspeed, and distance from the ground references.
- After choosing a square, a rectangular field, or an area with suitable ground references on all four sides, the maneuver should be entered on the downwind leg like a typical traffic pattern entry. Because of the tailwind, this leg has the highest groundspeed and, in an ideal situation, no drift correction should be necessary.
- The turn to base leg is made with a steep bank angle because of the high groundspeed,and as the tailwind becomes a crosswind, groundspeed reduces and the pilot must compensate for wind drift.
- The turn onto the upwind leg is made with a medium bank angle. Wind correction is again (ideally) non-existent because the wind is opposite the direction of the flight path. Groundspeed is at its lowest.
- The turn to a crosswind leg is made with a shallow bank angle. As the headwind becomes a crosswind, groundspeed increases and wind-drift correction must be applied.
- Finally, a medium-banked turn is made back to the downwind leg.
Common Errors
When performing a rectangular course (or the traffic pattern), a common error is flying too close to the reference line (think about a runway) on the downwind leg. If you are too close to the runway on downwind, this will shorten the base leg, giving you less time to stabilize your descent, causing you to end up high on final. For typical training-type airplanes, a distance of about ¾ of a mile away from the runway works well. This is about halfway up the wing strut on a high-wing airplane, or at the wingtip for a low-wing airplane.Be sure not to overcompensate and end up on a 2 mile wide downwind leg.
More often than not, students are able to pick a field with an adequate reference line and determine the wind direction to enter the maneuver. Errors stem from a lack of situational awareness—their inability to keep the airplane flying in a straight line or maintain the same distance from the reference throughout the maneuver. Theoretically, the downwind and upwind legs require no crosswind corrections since the wind should be flowing parallel to those legs. However, in practice, this is a rarity and winds often shift during the maneuver. Remember to always check your visual references against your wingstrut or wingtip.
 Turns Around a Point
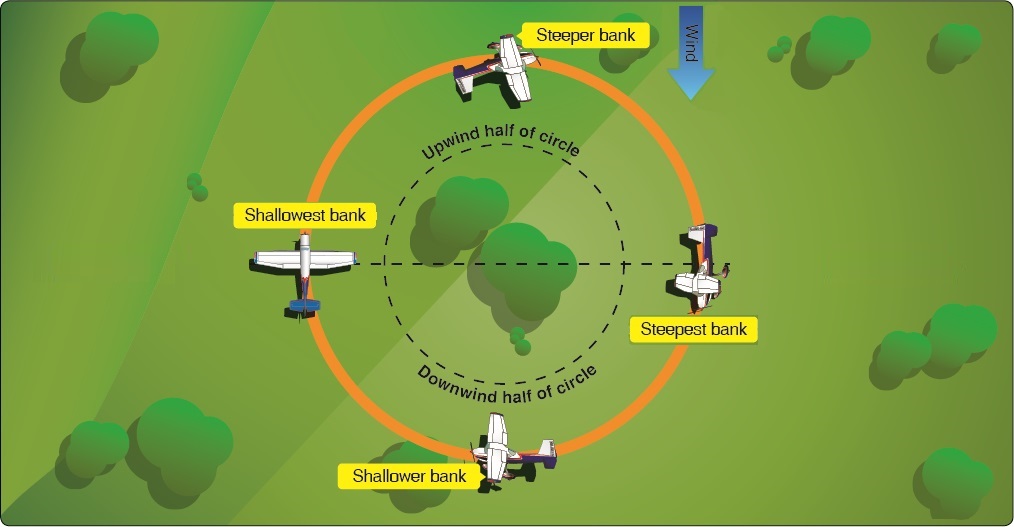
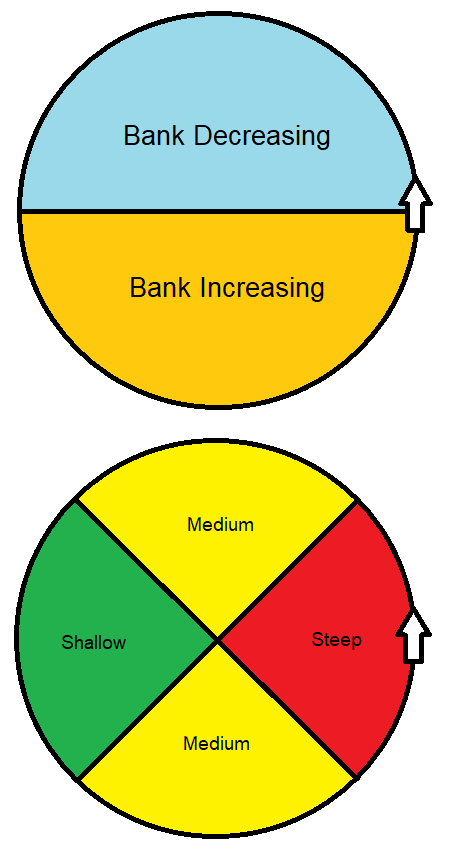
Turns Around a Point require a 360° constant radius turn around a single ground-based reference point, such as a tree or an intersection. The maneuver helps pilots judge the wind while constantly adjusting the bank angle to maintain a constant radius around the selected point.
- The maneuver should be entered with wind behind you, thus groundspeed will be at its highest at the start. As the airplane approaches the selected point, a steep bank angle is used initially to avoid drifting beyond the desired radius.
- The nose of the airplane should lead the turn as it flies through the first 90° of the maneuver. In other words, the nose should be pointing more towards the point, beyond a heading that is perpendicular to the entry heading, to allow for sufficient drift correction. For visual reference, the wingtip should be behind the point.
- As the turn continues, the bank angle should be continually reduced until it passes through the 180° point. At this point, the groundspeed is at its lowest and the wingtip should now be right on the point.
- Continuing through the 270° point, the groundspeed increases and so should the bank angle. However, not too much, as wind drift correction is opposite that of the 90° point and the wingtip should now be ahead of the point.
- Continue the turn to the entry heading as the groundspeed and the bank angle both increase.
 Common Errors
Students often fail to correct for the wind and hold a steep bank during the first half of the turn and cut in toward the reference point. Then, in the second half of the turn, the airplane drifts too far away from the point because it was already closer than it should have been. To correct this, remember that through the first 180° of the turn, bank should be at its steepest, then gradually decrease. In the second 180° of the turn, bank should be at its shallowest, then gradually increase. As you enter the maneuver, roll into a 30° bank (adjusting as necessary), then think about reducing to a medium bank angle of around 20° for the next part of the circle. As you approach 180° of the turn and begin flying into the headwind, reduce the bank even further, to about 10°, to avoid getting too close to the point.
In the second half of the turn, you do just the opposite. Hold the shallow bank, then increase to a medium bank angle at the bottom of the circle, until finally returning to your steepest bank as you approach the entry point. Remember, these bank angles are a guide and you should continually adjust your bank angle to maintain the same radius from the point throughout the maneuver.
There is a direct correlation between groundspeed and bank angle. Faster groundspeeds equal steeper bank angles.
 S-Turns
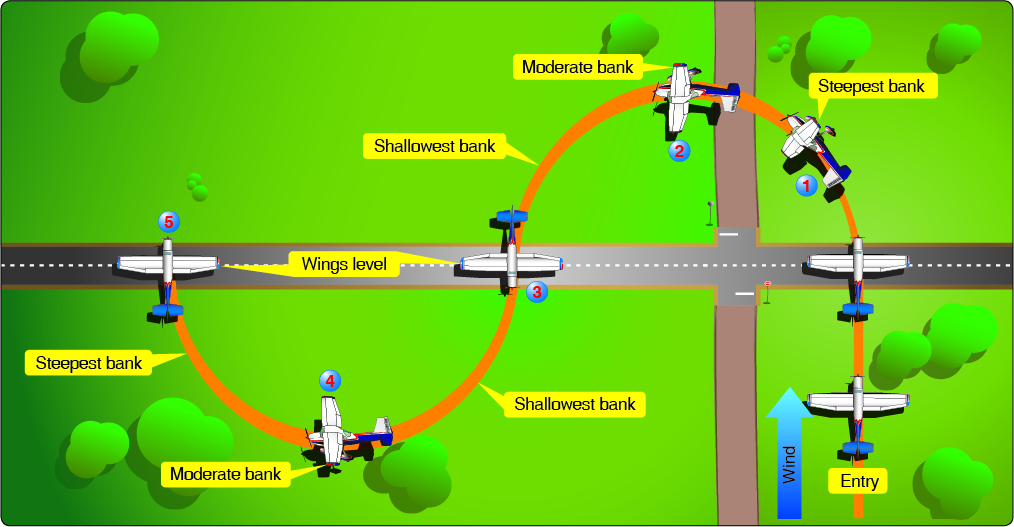
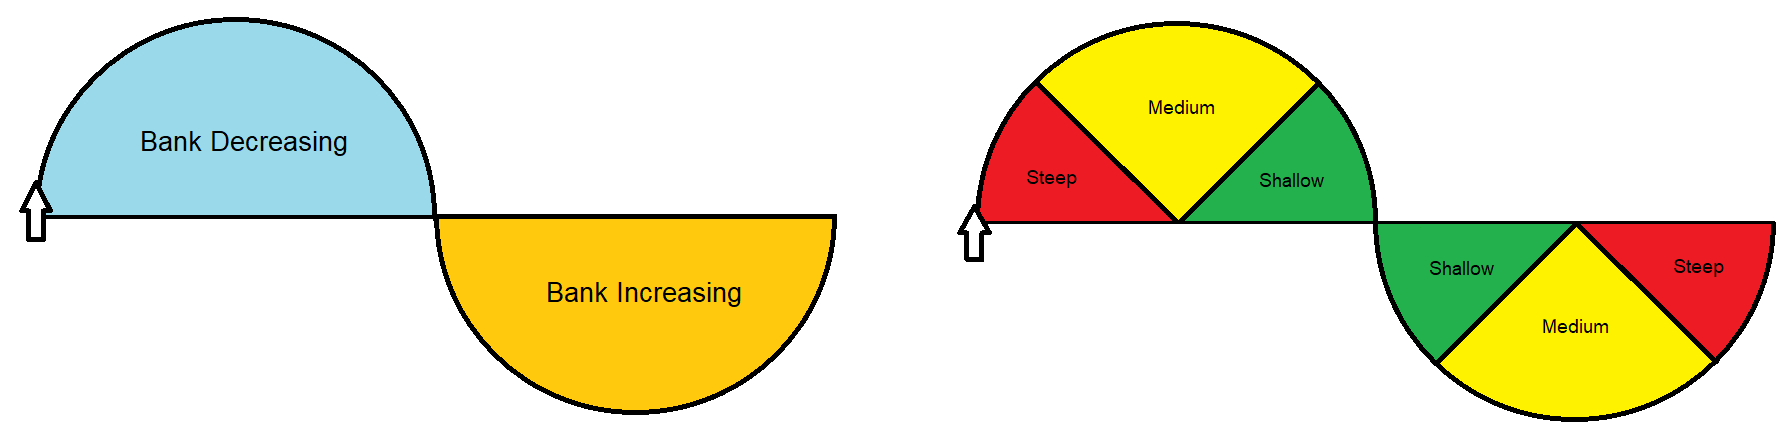
S-turns use the same general method applied to turns around a point, except they require you to make the second half of the turn in the opposite direction. In both maneuvers, the first 180° of the turn should involve gradually decreasing bank and the second 180° should involve gradually increasing bank.
- Similar to turns around a point, students should begin an s-turn with a tailwind and an appropriate steep bank. Failing to decrease the bank enough through the turn will result in a very tight turn that causes the airplane to cross the reference line before being wings-level.
- Similarly, in the second part of the turn, if the bank angle is increased too quickly (i.e., rolling straight into 30° of bank instead of slowly increasing the bank through the turn), the plane will reach a point perpendicular to the reference line too early. Just like turns around a point, s-turns can be broken down into different segments of steep, medium, and shallow bank angles, with the steepest bank on downwind and the shallowest bank on upwind.
In Summary
 As a pilot, we strive to master everything perfectly. But, as humans, we make mistakes. Errors are inevitable, so there is always room for improvement. How well you are able to fly any maneuver depends a lot on your level of understanding and experience. Paul Duty adds, “In order to increase proficiency, it is important to practice regularly and, perhaps most importantly, evaluate your recent experience.” Knowing why these maneuvers are done and understanding the concepts behind each maneuver will help prevent the common errors and you’ll become a safer, more competent pilot.
To learn more about the flight maneuvers required to become a pilot, check out the Gleim Flight Maneuvers and Practical Test Prep. These books provide step-by-step instructions for all flight maneuvers required for to train for your pilot certificate in accordance with the FAA Airman Certification Standards, plus a complete discussion of the common errors for each maneuver.
Written by Karl Winters, Gleim Aviation Editor and Assistant Chief Instructor