Aviation Training Consultants: 800-874-5346

X-Plane Flight Training Course Multi-User Installation Guide

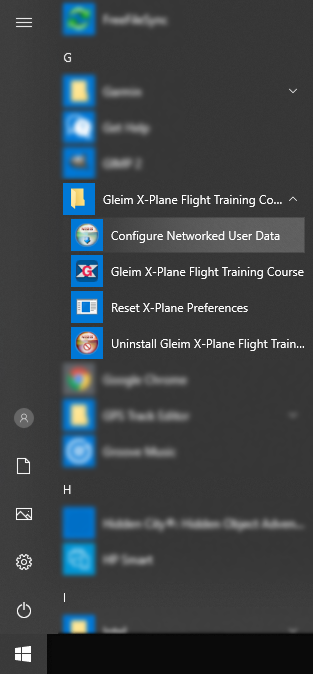
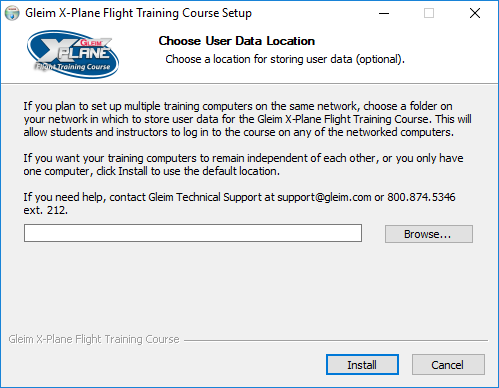
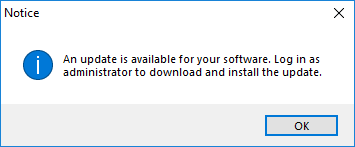
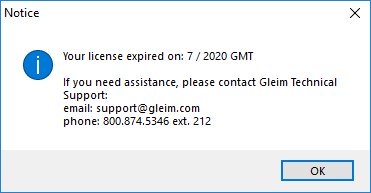
Thank you for using the Gleim X-Plane Flight Training Course – Multi User Edition! Follow the instructions below to configure your setup and get started. If you require assistance during your install you can contact Gleim Technical Support at support@gleim.com or 800.874.5346 ext. 212.

Network Setup

  1. If you are setting up a network of Gleim X-Plane Flight Training Course (XFTC) computers, complete the following steps before running the XFTC Launcher. If you are only setting up a single XFTC computer, you can skip this section.
    1. If you run the Launcher before completing network setup, any user accounts you create in XFTC will only be created on the computer you are using; none of the other computers on your network will have access to those accounts.
  2. Open the Windows Start Menu and scroll down until you find the “Gleim X-Plane Flight Training Course” folder.
  3. Click on the Gleim folder and then click “Configure Networked User Data.”
  4. Read the instructions and enter a network location at which to store the user data. Make sure your computers have read and write access to this location.
  5. Click “Install” and the XFTC Launcher will start. The user data folder will be created at this point in the location you selected in the previous step.
  6. Repeat these steps for each XFTC computer on your network. Select the same user data location each time for the data to be properly shared between all computers.
  7. If you mistakenly entered an incorrect path to the networked user data, you can run the configuration again.
    1. Note: This will not move existing user data to a new location. Existing user data will remain usable in its original location.
    2. If user data already exists at the new location, it will be used. If not, a new user data folder will be created.
    3. If you absolutely need to move existing user data, you must do that manually (outside of XFTC), and then run the network configuration and choose the new location.

Activation

  1. When starting XFTC for the first time is the activation screen. Once the course is activated, this screen will not appear again.
    1. If you are setting up a network of XFTC computers, you will have to activate each one individually.
  2. Fill in the requested information and then click “Continue with Activation.”
  3. If your computer is connected to the Internet, click “Yes” and enter the Customer Key that came with your purchase.
    1. If not connected to the Internet, contact Gleim Technical Support at 800.874.5346 ext. 212 or support@gleim.com.
  4. Click “Activate” and you will see a message confirming successful activation.

Admin Account

  1. When you run the XFTC Launcher for the first time, you will be asked to create an admin account. You must create this account to continue.
  2. If you are setting up a network of XFTC computers, you will only have to create the admin account once.
  3. You may enter any valid email address and password, but make sure to use something you will remember. You will have to log in with this account to create and manage other accounts.

Account Types

Admin

  1. There is one admin account for each XFTC system.
    1. “System” can mean a single XFTC computer, or a network of XFTC computers sharing user data.
  2. The admin account is responsible for managing all other user accounts.
    1. It can create, edit, and delete accounts.
    2. It can also view the flight history for any user.
  3. The admin account also handles administrative tasks like activation and updates.
  4. The admin account can not fly lessons.
 

Instructor

  1. Instructor accounts share all the properties of student accounts, but can additionally view the flight history of other accounts that are assigned to them.
  2. Instructor accounts can have an unlimited number of students (and other instructors) assigned to them, but an account can only be assigned to one instructor at a time.
  3. Accounts can only be assigned to an instructor by the admin account.
 

Student

  1. There is no limit to the number of student accounts that can be created.
  2. Student accounts can fly any lesson in the course.
  3. Flight history is saved separately for each student.
  4. Students can only view their own flight history.
 

Guest

  1. There is one guest account for each XFTC computer.
    1. This remains true even if multiple XFTC computers are set up to share user data on a local network. The guest account is never shared.
  2. The guest account only has access to the first two lessons, and can be used as a quick “demo” account without setting up a new user.

Online Updates

  1. The XFTC Launcher checks for updates at startup. If an update is found, a message will be shown stating that an update is available.
  2. Updates can only be installed by the admin account. When the admin logs in, and an update is available, they will be given the opportunity to download and install it right then.
  3. The admin can also check for updates manually from the About Page after logging in.
  4. Gleim recommends always installing updates when they are available.
    1. If you have multiple networked XFTC computers, you should update them all at the same time. Sharing user data between computers running different versions of XFTC could have unpredictable and undesirable results.

Getting Started

  1. All users should start by watching the tutorial videos on the Getting Started screen, accessible from the main screen of the Launcher. If you have any questions that are not answered by those videos, please contact Gleim Technical Support at 800.874.5346 ext. 212 or support@gleim.com.

Renewal

  1. The X-Plane Flight Training Course Multi User edition will popup a notice within 30 days of the expiration date for your purchased license.
  2. When your license has expired this notice will appear.
  3. Contact Gleim at 800.874.5346 to renew your license key then follow these steps to reactivate your license:
    1. Log in to the XFTC Launcher as the admin.
    2. Click About.
    3. Click Activate.
    4. Click Continue with Activation.
    5. Replace the existing Customer Key with the new one.
    6. Click Activate. Renewal is now complete.
    7. Close the activation screen and log out of the admin account.
    8. (Optional) Click About to verify the new expiration date.